 |
| A Zerg Base from Starcarft II. This image is from; http://playeraffinity.com |
Lots of blowing stuff up really.
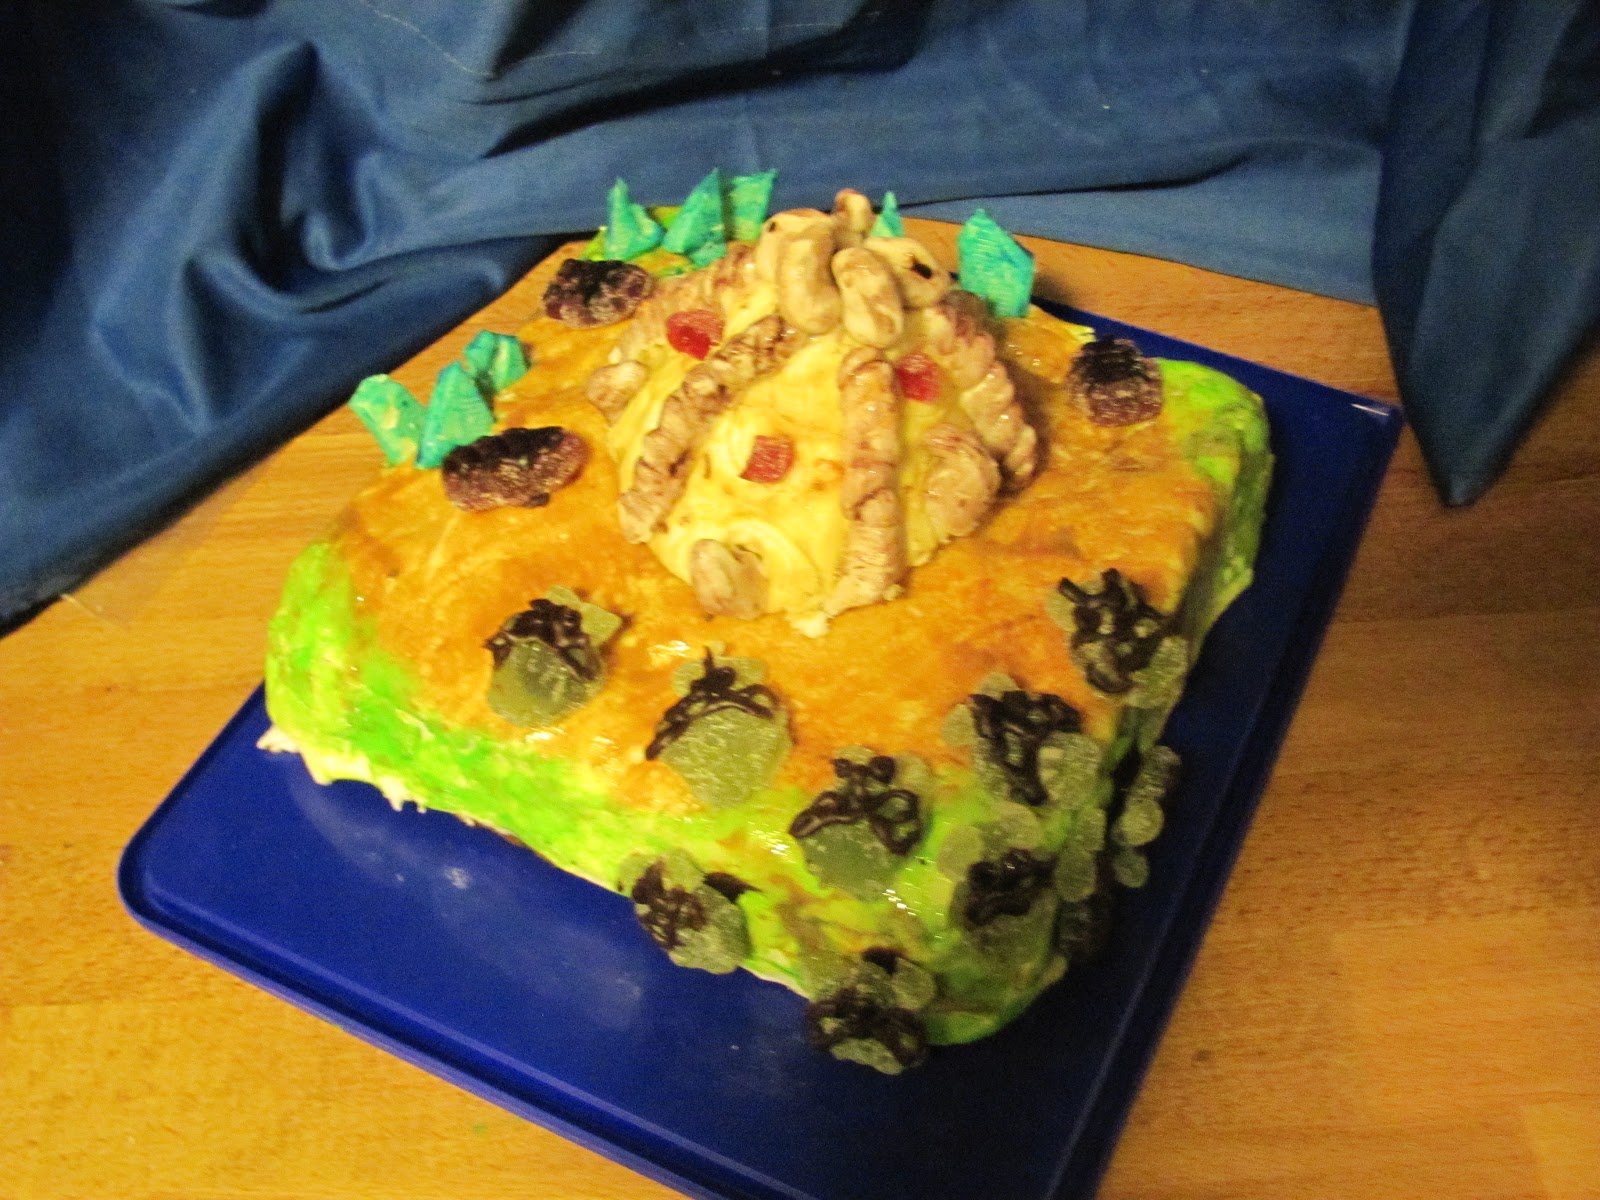
I was asked to make a Starcraft cake for a birthday, this is what I came up with:

I was asked to make a Starcraft cake for a birthday, this is what I came up with:
Cherry Cake
Prep time: 15 mins
Cooking time: 1 hr 40 mins
A cherry cake was requested, so I adapted this classic Delia Smith recipe to add in more fruit, as I needed a dense cake to use as base. The original recipe can be found here;
500g of glace cherries, both dark and light
225g butter
4 eggs, beaten
225g self raising flour
200g caster sugar
1 tablespoon milk
A few drops of vanilla essence
1. Pre-heat the oven to 180°C
2. Chop all the cherries into halves
3. Cream the butter, sugar and vanilla essence together in to a smooth paste.
4. Add the beaten egg mix until all the lumps have gone.
5. Sift in the flour and stir.
6. Add the milk if the mixture is to stiff, it should be drop-able but not sloppy.
7. Place the cake mix into a deep tin, cover it with tinfoil and cook at 180°C for about hour.
8. Remove the foil and put the cake back in the oven for another 30-40 mins until the cake has shrunk and a knife comes away clean through the middle of the cake.
9. turn the cake out and allow it to cool.
Decoration.
Prep time: about 8 hours
1 pack of ready made royal icing
1 tube of chocolate writing icing
All the red a green sweets form a bag of sweets ( for example jelly bug/ aliens or fruit pastilles)
cherry jam, warmed
white chocolate, broken into shards
blue food colouring
yellow food colouring
red food colouring
The golden rule to decorating is be clean and tidy. When you're working with white icing there is nothing more annoying then getting a spot of colour on it.
Make sure your work area and hands are clean and dry before you start, and whenever you change colours.
1. Split the block of royal icing into 2- 1 potion of 1/3 and 1 of 2/3.
2. Roll the larger block out on a clean, sugared surface to a thickness of about 1/2cm
2. When the cherry cake has cooled completely cover it with a thin layer of warm cherry jam, then place the rolled out icing on top. Smooth over to remove any air bubbles and trim off the excess.
3. Set the cake aside to dry for at least an hour- don't be tempted to touch it, play with it or poke it!
4. While the cake is drying paint the first coat of blue dye on the chocolate, then set aside to dry. Because food dye is water based and chocolate is fatty, the dye with try hard not to stick, however persuasive and you will get a thin coat applied. This layer is important because once it has dried it's easier to add subsequent layers for a stronger colour.
5. Also while the cake is drying use the chocolate writing icing and green sweets to make a bunch of Bainlings. I did this by cutting 2 corners off a triangle sweet, sticking therm to the front as pincers ( with chocolate icing) and then highlighting the carapace circles and eyes in icing.
6. Using the red sweets do the same thing to make drones.
7. Set both sets of sweets aside to dry. If the first coat of blue dye is dry on the chocolate add another coat, and put aside to dry.
8. Collect all the spare sweets together into a bowl and label 'spare sweets', allow people who have wondered into the kitchen to see what you're up to to eat only these sweets, or your Bainling hoard will be depleted by passers-by.
9. Mix up the base colours for the cake, i.e brown and green. Using a clean wide paintbrush dapple on a brown centre piece ( where the hatchery is) and blend into a greeny brown around the edges ( for the rest of the map). When the icing is all coloured set aside to dry.
10. Add another coat of blue to the chocolate and set aside.
11. Making the hatchery.
11.1 Take the 1/3 icing bock and remove 1/3.
11.2 Roll the larger block into a cone, using a pallet knife score in line details.
11.3 Mix up a brown dye and coat the hatchery. Allow to dry.
11.4 hatchery sides- roll a number of small balls with the remaining icing, flatten with your thumb to form a disc, and then over lap with other discs. Paint a purple- brown colour and allow to dry.
11.5 for the top and bottom of the hatchery make 10 horns, colour as sides and allow to dry.
12. When all of the bits have dried you can assemble the cake.
-Place the hatchery in the middle and attach the sides and horns, using the chocolate icing as a glue if needed. If you have any sweets left over you can use these as decoration for your hatchery.
- stick your green Bainling hoard around one side and top with chocolate icing on the underside of each sweet.
- using a sharp knife to cut the icing and cake if needed, stand the chocolate shards up in a semi circle on the far side of the hatchery.
- place the red drones between the hatchery and the mineral crystals.
13. Stand back and admire your finished cake!
Variations
- Make life easy- buy a pre-made cake and decorate it. The cake needs to be dense enough to hold the weight of the icing tower in the middle.
- I used gel icing colours, but they gave the cake a wet sticky finish, I'd use normal food colour if I made this cake again.

 |
| The finished cake! |
No comments:
Post a Comment